Top 10 Ingredients to Building an Heirloom Family History Book


One.

Stories – Your stories can come in a variety of forms. They may be a collection narrative nonfiction short stories about a variety of ancestors. You may choose to write a longer form story taking the reader through an epic adventure based on one ancestor, a couple or a surname line.

Two.

Profiles – You can include ancestor profiles in your book to give your reader a snapshot look into an ancestor. Use profiles when you have too many gaps in your research to tell their whole story. If the ancestor has a great story, they are an interesting person, but they are not directly part of your main narrative consider writing a profile in the sidebar or give them a single on off page. This page is dedicated to a great-uncle who died at Passchendaele in WWI. He wasn’t directly part of the story, but we felt the need to honour him.

Three.

Pedigree Charts – Pedigree charts can serve the readers as a beautiful big picture view of their family history. If you are covering several surname lines in a book, consider including one for each.

Four.

Group Sheets –Each time you start a new family, a group sheet a is a great way to give the reader a big picture view. You can also include some smaller details and facts on the group sheets. By making sure all these details are on the group sheet, you won’t feel required to cram it all into the story. The story can then be a story and not a collections of facts woven together.

Five.

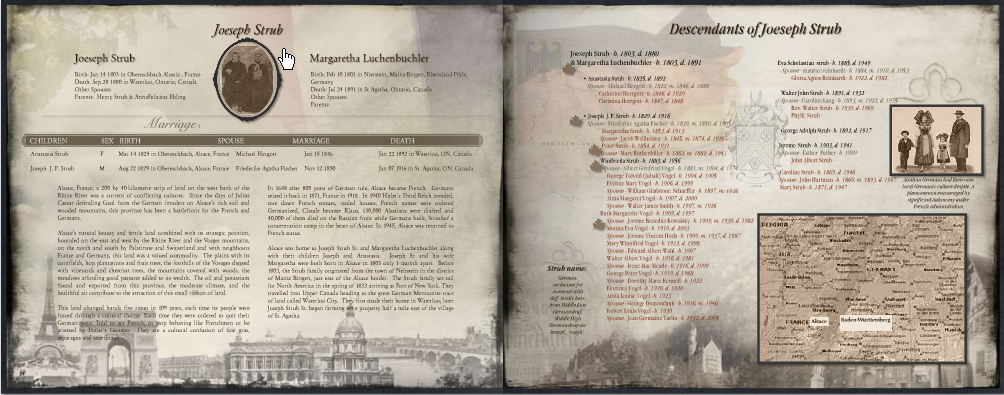
Descendants Chart – The descendant’s chart can help you to include the children of a couple, along with their spouses and children. This conveys a lot of information that may not be part of the direct line you are writing about but still expresses your research and can be an excellent resource for the family.

Six.

Pictures – Choose pictures that enhance your story and show your ancestors in various stages of their life. Unfortunately, not everyone will take the time to read the stories. Sigh.

Seven.

Picture Collage – Consider creating a picture collage, it can demonstrate a life without words.

Eight.

Documents – Choose poignant documents that reveal essential turning points in your ancestor’s life. Passenger lists, land document, will. Don’t feel obligated to include every census and vital record you have uncovered only the ones that were critical to the direction of your family history. If you wish to share the rest of your research and documents, save them to a cd and insert in the back of your book.


Nine.

Sources – Don’t forget to include your sources. While footnotes may not be ideal for an Heirloom Family History Book, you can still add a list of sources at the end of your book referencing the page numbers and quote the line of the fact. You can also add your list of sources to the cd if you want to keep a clean look to your heirloom book.

Ten.

Current Family – Don’t forget to include your present family in your book. If they are in it and they can see their connection to the past they are more likely to take up interest and buy your book.


1 thought on “Top 10 Ingredients to Building an Heirloom Family History Book”

  1. Thank You! Thank You! You always give me that extra boost to get me back on track. These tips were made just for me.

Comments are closed.

Related Post

Creating a Legacy Family History BookCreating a Legacy Family History Book

It’s time to stop procrastinating and start pulling your research into a family history book. Is the thought a little overwhelming? Not sure where to start?

Here at The Family History Writing Studio, we believe in helping you preserve your family history in a sharable and entertaining format. We want your family history book to be a book your family wants to read and pass down for generations to come.

It’s time to stop procrastinating and start pulling your research into a family history book. Is the thought a little overwhelming? Not sure where to start? We are here to help.

We have a brand new course starting in just a few weeks. We are excited to be delivering Creating a Legacy Family History Book. Take a look at our video, it’s just 6 minutes long and we’ll take you inside a Legacy Family History Book created with the MyCanvas software.

Your book could look like this!  Watch the video!


Here’s What You’ll Learn

Week 1 – Introductions

  • MyCanvas Tour
  • Your First Decisions

Week 2 – Getting Ready to Build and Write

  • Importing Files from Ancestry and Beyond
  • Creating a Workflow

Week 3 – Handling Pictures and Documents

  • Prepping Your Pictures and Documents
  • Copyright and Permissions

Week 4 – Structuring Your Book and Stories

  • Structuring Your Book
  • Structuring Your Stories

Week 5 – Assembling a Page

  • Basics of Assembling a Page
  • Creating a Story Framework

Week 6 – More Pages, More Writing

  • Creating a Variety of Pages
  • Bringing Your Ancestors to Life on the Page

Week 7 – Polishing Your Book

  • Revision and Editing

Week 8 – Final Product, Now What?

  • Ordering Your Book
  • Recap and Final Questions


 [button url=”https://www.familyhistorywritingstudio.com/product/creating-a-legacy-family-history-book/” class=”yellow” bg=”” hover_bg=”” size=”0px” color=”” radius=”0px” width=”0px” height=”0px” target=”_self”] I Want To Build a Legacy Family History Book [/button]


How the Class Works

Each week you will have access to one or two videos, each helping you to understand how to build a book using the MyCanvas software but also you’ll learn about structuring your book and your stories. We won’t just talk about the book we will talk about the skills you’ll need to write entertaining stories.

You can download the videos each week and watch them when they are convenient to you. If you have any questions over the course of the 8 weeks you’ll have to two teachers in the forum to help you with your project.

The homework is completely optional but we hope you’ll complete the homework so that we can help you with any questions you may have along the way.

Here are a few comments from some students who have already taken some of our classes, so you can be sure we will deliver quality and value for your money.

What Students Have Said about The Family History Writing Studio

Kim Said:

I thoroughly enjoyed completing this course in “Writing a Family History Scene” and would recommend it to all aspiring family history writers. It is inspiring when you can see yourself and your fellow students improve so much by the end of the course. Lynn’s teachings have given us the tools to carefully craft our stories for the enjoyment by our families. I have learned so much.

Denise Said:

This course opened my eyes to scene structure. My writing improved immensely once I had the right tools and guidance to build a scene properly. This is my second Family History Writing Studio course, and it will not be my last. Between Lynn’s excellent guidance and the input from the other students, it was an interactive learning experience I highly recommend to anyone who is thinking of writing a family history narrative. In order to do any job properly, you need the right tools and, in my opinion, this is the place to build your toolbox.

[button url=”https://www.familyhistorywritingstudio.com/product/creating-a-legacy-family-history-book/” class=”red” bg=”” hover_bg=”” size=”0px” color=”” radius=”0px” width=”0px” height=”0px” target=”_self”] I Want To Build a Legacy Family History Book [/button]

Now that we’ve answered all your questions click the link, add the course to the shopping cart and checkout. After checkout, you’ll receive an email welcoming you to the class. Closer to the date of the first class you’ll receive and email and some instruction for finding your way around the website and getting acquainted with the forum.

We look forward to seeing you in the classroom.[/vc_column_text][/vc_column][/vc_row]

Creating a Family History Book: An Action Plan with TemplateCreating a Family History Book: An Action Plan with Template

Now that you completed the Milestone Goal Planner that we provided for in Part 2 our series on Planning a Family History Book in 2018. You should feel much more comfortable about having a solid direction and plan for your family history book. You certainly have a lot of work ahead of you, but now with your Milestone Goals identified your vision for your book is clearer.

Now, we move on to step 3 – The Family History Book Project Planner.

Sometimes a project can go rather smoothly, and sometimes it can be a complete nightmare that wakes you up at 2 am every night.  A Family History Book Project Planner is the best defense against chaos and sleepless nights.  The project planner is a timeline planning tool that will help you to organize all your milestone steps and actionable tasks in a consistent and readable manner. This tool will help to make jobs, milestones and dates crystal clear. The more straightforward and more uncomplicated it is to read – the better. Don’t worry I have a simple template all ready for you. You just have to plug-in your tasks and dates.

Now, most of the information like milestones and tasks we completed in Part 2. So we just need to plug them into our spreadsheet. However, on our Family History Book Project Planner, we are going to add a few more items.


Add resources to each task. Some of your jobs may require specific resources to We want to add these resources to our planner.


Show duration of tasks. Each task should have a start and an end date. You can fall off schedule quite quickly if we don’t give ourselves hard stops along the way for our tasks. It’s not enough just to have dates for the Milestone Goals, but our tasks need clear timelines as well.


Add notes to your tasks.  Add notes to the responsibilities that might seem confusing or need explanation. It never hurts to add detail. The more specific the timeline, the easier it will be in referring to and keeping you and your project on target.


Ask someone to review your Project Planner. You know the saying ‘can’t see the forest for the trees.’ Well, it never hurts to have a second set of eyes look at your Project Timeline to make sure it all makes sense. Before you finalize your timeline, have someone you trust be your second set of eyes. Have them check it to make sure it all makes sense. Even without knowing your project, the Project Planner should be clear for them to read and follow along.

We set up the Family History Book Project Planner in tow easy to use Excel and PDF formats.  Download below.


Family History Book Project Planner (Excel)

Family History Book Project Planner (PDF) 


Your family history book project can change, and all good plans should be flexible. But don’t let all your preparation be hijacked by family members demanding certain things be put in or left out of your family history book. The first version of your plan is your baseline, and it outlines every step you need to take to get from the beginning to the end of your project. Sure, strategies can change. New scopes can quickly creep in. But remember changes can cost you time and money. Let your planner help you to argue the case for or against these changes. Let your Family History Book Project Timeline be your project’s roadmap.

Now that your plan is complete and in place, it’s time to start doing. Don’t let the planning stage take over your life. The point of the plan is to get you to the starting line so that you can run the race and cross the finish line. Don’t just train for the race, run it. Too many family historians, talk and plan their family history book but never bring the project to the finish line. Let our Family History Project Planner be the tool to help you bring your family history book across that finish line.


Coming up Next: How to incorporate daily habits into your life that will support your family history book project.