Creating a Legacy Family History Book


It’s time to stop procrastinating and start pulling your research into a family history book. Is the thought a little overwhelming? Not sure where to start?

Here at The Family History Writing Studio, we believe in helping you preserve your family history in a sharable and entertaining format. We want your family history book to be a book your family wants to read and pass down for generations to come.

It’s time to stop procrastinating and start pulling your research into a family history book. Is the thought a little overwhelming? Not sure where to start? We are here to help.

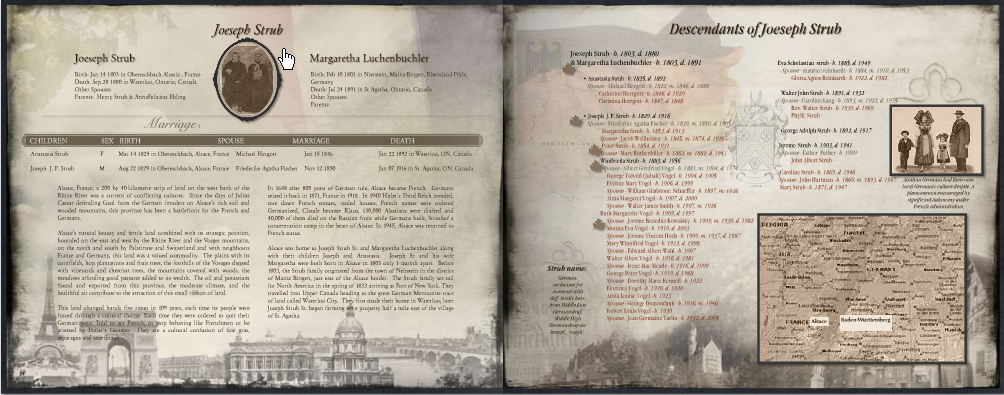
We have a brand new course starting in just a few weeks. We are excited to be delivering Creating a Legacy Family History Book. Take a look at our video, it’s just 6 minutes long and we’ll take you inside a Legacy Family History Book created with the MyCanvas software.

Your book could look like this!  Watch the video!


Here’s What You’ll Learn

Week 1 – Introductions

  • MyCanvas Tour
  • Your First Decisions

Week 2 – Getting Ready to Build and Write

  • Importing Files from Ancestry and Beyond
  • Creating a Workflow

Week 3 – Handling Pictures and Documents

  • Prepping Your Pictures and Documents
  • Copyright and Permissions

Week 4 – Structuring Your Book and Stories

  • Structuring Your Book
  • Structuring Your Stories

Week 5 – Assembling a Page

  • Basics of Assembling a Page
  • Creating a Story Framework

Week 6 – More Pages, More Writing

  • Creating a Variety of Pages
  • Bringing Your Ancestors to Life on the Page

Week 7 – Polishing Your Book

  • Revision and Editing

Week 8 – Final Product, Now What?

  • Ordering Your Book
  • Recap and Final Questions


 [button url=”https://www.familyhistorywritingstudio.com/product/creating-a-legacy-family-history-book/” class=”yellow” bg=”” hover_bg=”” size=”0px” color=”” radius=”0px” width=”0px” height=”0px” target=”_self”] I Want To Build a Legacy Family History Book [/button]


How the Class Works

Each week you will have access to one or two videos, each helping you to understand how to build a book using the MyCanvas software but also you’ll learn about structuring your book and your stories. We won’t just talk about the book we will talk about the skills you’ll need to write entertaining stories.

You can download the videos each week and watch them when they are convenient to you. If you have any questions over the course of the 8 weeks you’ll have to two teachers in the forum to help you with your project.

The homework is completely optional but we hope you’ll complete the homework so that we can help you with any questions you may have along the way.

Here are a few comments from some students who have already taken some of our classes, so you can be sure we will deliver quality and value for your money.

What Students Have Said about The Family History Writing Studio

Kim Said:

I thoroughly enjoyed completing this course in “Writing a Family History Scene” and would recommend it to all aspiring family history writers. It is inspiring when you can see yourself and your fellow students improve so much by the end of the course. Lynn’s teachings have given us the tools to carefully craft our stories for the enjoyment by our families. I have learned so much.

Denise Said:

This course opened my eyes to scene structure. My writing improved immensely once I had the right tools and guidance to build a scene properly. This is my second Family History Writing Studio course, and it will not be my last. Between Lynn’s excellent guidance and the input from the other students, it was an interactive learning experience I highly recommend to anyone who is thinking of writing a family history narrative. In order to do any job properly, you need the right tools and, in my opinion, this is the place to build your toolbox.

[button url=”https://www.familyhistorywritingstudio.com/product/creating-a-legacy-family-history-book/” class=”red” bg=”” hover_bg=”” size=”0px” color=”” radius=”0px” width=”0px” height=”0px” target=”_self”] I Want To Build a Legacy Family History Book [/button]

Now that we’ve answered all your questions click the link, add the course to the shopping cart and checkout. After checkout, you’ll receive an email welcoming you to the class. Closer to the date of the first class you’ll receive and email and some instruction for finding your way around the website and getting acquainted with the forum.

We look forward to seeing you in the classroom.[/vc_column_text][/vc_column][/vc_row]

Related Post

How to Create a Content Plan for Your Family History BookHow to Create a Content Plan for Your Family History Book

The most important thing you can do before beginning to build your family history book is to create a content plan. Whenever we take on a project of this size, it’s always best to invest in some time upfront to think through your project.

Why you need a content plan

If you start to write without a content plan, you’re likely to waste a lot of valuable time staring at a blank screen. This is because you’re trying to simultaneously figure out what you want to write, who you want to write about while trying to write. You don’t have a clear idea of structure, organization and contents of your book.

With a plan, you’ll be more likely to start writing immediately. You’ll have a clear outline of each section, chapter, story and profile, the contents and how each will flow into the next.

By creating a content plan, you also engage your brain.  The process of thinking your book out in advance will result in you brainstorming about your book as you work, drive, relax, even sleep. You will continually be searching for ideas and making connections.

Trying to put together a family history book without a plan is an invitation to disaster. Most likely resulting in false starts, wasted efforts and low productivity.

You don’t have to know the content of each paragraph, each sentence, but you should aim for a well-thought-out strategy.

Step 1. Start with a Brain Dump


  • The best place to start creating the content for your family history book is with a brain dump. Dump all your ideas you have about your book into a mind map.
  • Start by identifying the focus of your book? One ancestor, a couple, a family group or one or more surnames?
  • You then want to break down the focus into smaller components, subtopics, maybe even themes.
  • What are the main points you want to cover? With a highlighter, mark each of the big points with a single colour. These might become sections or chapters in your book.
  • What are the subtopics? These will become individual stories or profiles within the chapters or sections of your book. Highlight each of these with another colour.


Step 2 Organize your brain dump

There is no one single right way or tool to organize your family history book. What might be a productive process for one can be very frustrating an inefficient for another?

But there are many planning tools available to help you take your brain dump ideas and organize them. We listed a selection below including both low-tech and high-tech.


  1. Lists & outlines. After identifying the “big picture” of your book, the next step can be to expand your list from the main idea into key supporting points for each chapter in the form of a simple list.


  1. Index cards. Index cards are another time-proven writing tool. I use index cards to organize my stories, but they can be equally beneficial in assembling a book. Each card contains an idea which is then inserted into the right location in the organization of your book. Index cards can organize the topics of a book or the scenes and summary within a family history story. 


  1. Sticky notes. Sticky notes work much like index cards and help you to identify and organize your thoughts quickly. Add just one thought, idea or supporting detail to each sticky note, then attach the notes on a wall or whiteboard or tabletop. Move them around to organize your book. You can use different-coloured sticky notes to colour code your idea.


  1. Create a table. Using a word processing program, like Microsoft Word, you can create a detailed content plan your book. For example, create a 2, 3 or 4 column table in Word, you can list your book into sections, chapters and stories and profiles.


  1. Spreadsheet. Consider using a spreadsheet program, like Microsoft Excel, to plan your book. The process is similar; in the first column, enter the title for each story or profile. In the second column, summarize the main idea associated with each story or profile. In the third column, enter the events and ideas you want to include. Check out the spreadsheet created by one of my students in our recent course, Plotting a Family History Story. This is part of an outline of a family history story. But the same can be done to organize an entire family history book.


  1. Mind maps. I use mind mapping software for all my projects in the very early stages to get down my ideas and help organize them into a logical process as I mentioned above. But mindmaps can also be used to complete your outline. You can make your mind map on a simple piece of paper, a whiteboard or in a digital program like Scapple. I use Scapple for all my brainstorming tasks because first I can use it do braindump but then easily rearrange my brain dump into a logical order for my book. I rearrange as many times as I like never killing a tree.


  1. Digital Storyboard.  Another option is to create a digital storyboard. One of my favourite digital storyboards comes in the Scrivener software. Scrivener uses a digital corkboard with digital index cards to help you outline and organize your story and book. Watch this video to learn how to make a storyboard in Scrivener.

Before diving in feet first to create a family history book, take the time to brainstorm and organize your thoughts into a content plan. Explore the various options to outline your project and choose the one that works best for you.


The sooner you come up with your own efficient way of organizing your ideas before you begin writing, the sooner you can embark on your journey of writing your book!

Brainstorming and organizing a content plan is just two steps in the process of building a


family history book. In our new workbook, Build a Family History Book, A Planning Guide to Getting it Done, we identify an 8-step process for creating a family history book. It includes numerous templates to help you clearly define and organize the content for your family history book and the process to get you across the finish line.


Understanding Story Editing: The 4 StagesUnderstanding Story Editing: The 4 Stages

Your first draft is complete now what? Understanding story editing, including the 4 stages of editing your draft and when to use them is critical at this stage. In today’s Storylines, we look at the 4 stages of editing your manuscript. Learn how to present a polished story to your readers by ensuring you walk your draft through this process.