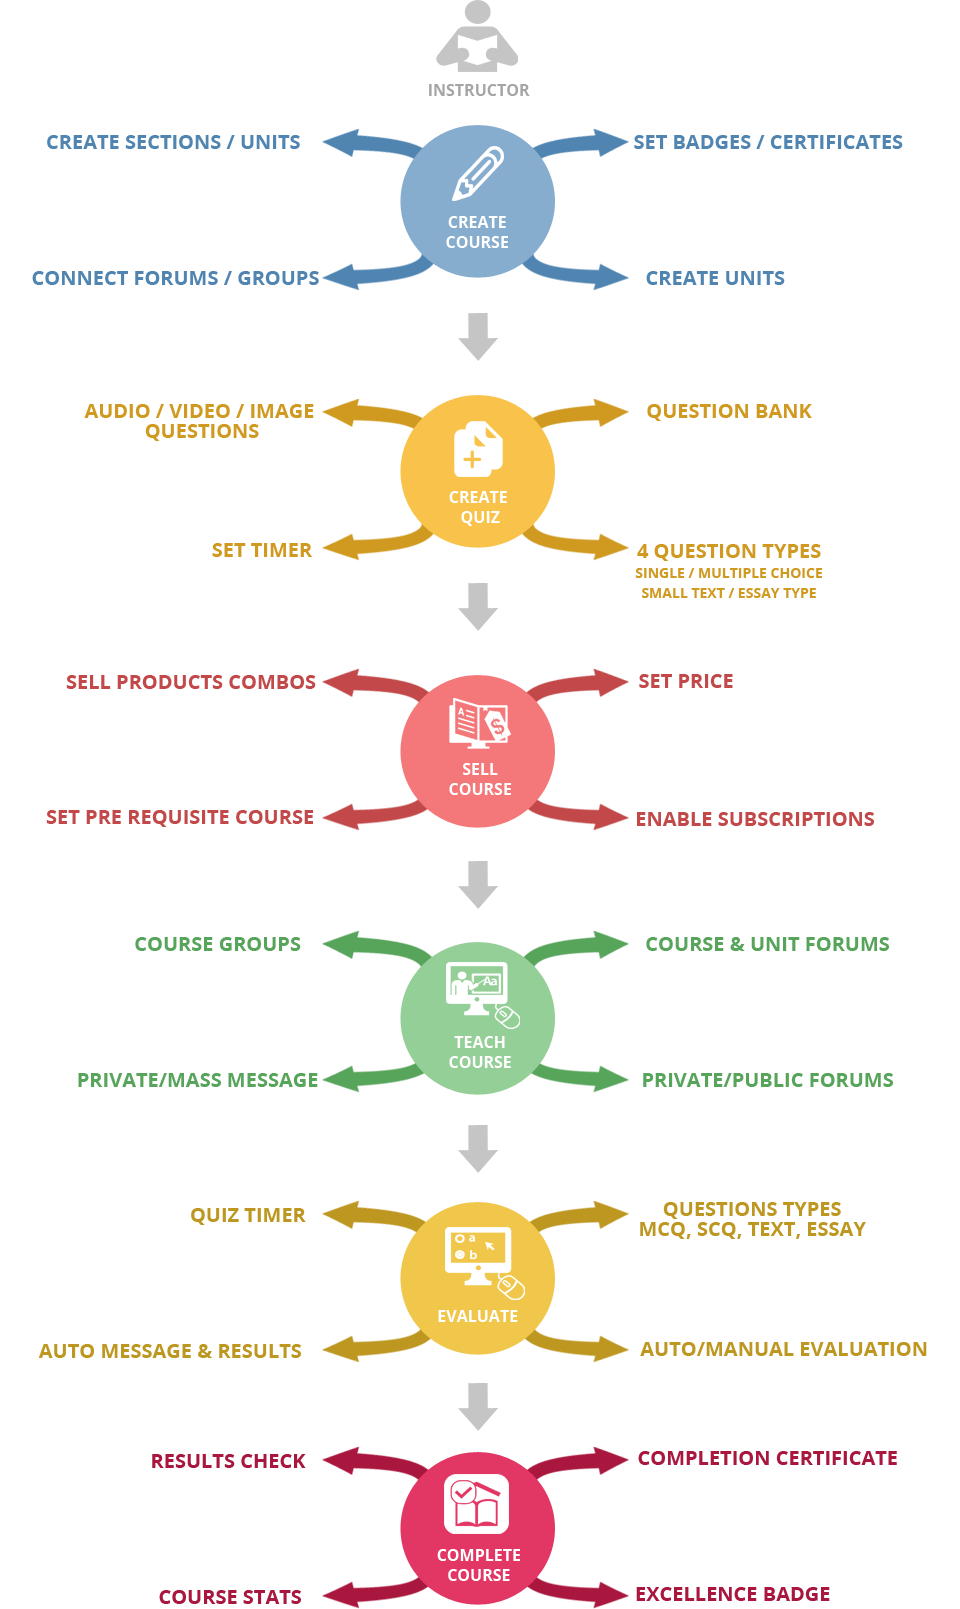
Instructor in WPLMS has a lot of controls and access rights. Below flowchart depicts the various functions of the Instructor.
Role
An Instructor is a user who creates the courses, manages the courses and students.
Instructor
An Instructor by default gets access to a lot of features in the sites. Like viewing all Questions in the question bank, viewing all units in the directory through the admin panel.
Instructor however can not edit or delete the contents from Units created by other Instructors.
An Instructor can not manually assign badges and certificates to students who are not taking the course.
Group Admin
An instructor is also the Group Admin of the groups connected to Courses published by him. An Instructor therefore can Add or Remove any student from the Group. An Instructor can also assign some students as Group Moderators for efficient functioning of the group.
Forum Admin
Just like the groups, an Instructor is the Forum administrator for the Forum Connected to the Course.
An Instructor can delete any sub-forum, topic in the Course forum.
An Instructor can ban any user in his/her forum.
Creating Courses
Only an Instructor or Administrator can create Courses in WPLMS
Creating Units
Units are the most basic elements in a course. Follow the steps to create a new unit.
Adding a New Unit
Login to Admin Panel
Go to LMS section and click on All Units.
Now click on Add New
Now fill in the details like Unit Name in the heading of the post, and the unit content in the editor area. The editor area is same as that for posts, pages and supports WordPress native audio and videosLearn More
Screenshot Walkthrough
Unit Settings
Unit Description: Enter a small list/description of the unit here. The description comes below the heading of the Unit.
Unit Type: Select unit type from General(Simple Text Unit) , Audio, Video or Podcast. Selecting the unit type comes handy in course curriculum where the unit icons are shown based on this selection i.e. in case of a video unit, a video icon will be shown along with the unit name in the course curriculum.
Free Unit: Select Free Unit Show or Hide. Show option makes the Unit as free and allow users to see the unit for non logged in users before purchasing the course.
Unit Duration: Enter the estimate of the duration of the course in Minutes.
Unit Forum: BbPress Forum can be connected to an individual unit from here. Select the Unit forum or Course Forum or any other forum instructor wish to connect with this Unit. Forums are useful for instructor and students interaction, clearing the doubts and creating a social connection within the group opting the course.
Screenshot Walkthrough
Unit Attachments
Unit Attachments are downloadable data attached to a unit which the students can download. These attachments are shown at the bottom of the unit. An attachment could be a video, audio, pdf, doc or a zip file. Follow below steps to add attachments to a unit.
Unit will now automatically detect the attached files and show them below the unit content.
Screenshot Walkthrough
Finishing Unit
Add the unit tags.
You can save the unit as draft for future releases or Publish it.
Creating Questions
Question is the most basic elements in a Quiz. Follow the steps to create a new question.
Adding a New Question
Login to Admin Panel
Go to LMS section and click on All Questions.
Now click on Add New button.
Now fill in the reference name of the question like “Maths Quiz1 Question1″ etc, naming your question helps in putting up questions together while making a quiz. After naming, enter the question in the editor area.
Screenshot Walkthrough
Question Settings
Question Type: Select question type here. You can select from Multiple Choice (Select one from options), Multiple Correct(There can be multiple answers), Select Drop down, Fill in the blank, Match answers, Sort answers, Small Text(One Word or Sentence), Large Text(Essay Type Questions).
Question Options : Enter option by clicking on Add More. You can arrange the order of the options by dragging the small arrow button(in blue) on left hand side of the option number.
Correct Answer: For Single/ Multiple choice, enter the correct answer choice number and separated by comma in case of multiple answers. In case of Small Text, enter the full complete answer in the space given. This would help the instructor to evaluate quiz after it is completed and submitted by the student.
Screenshot Walkthrough
Finishing Question
Add tags to the question
Publish
Creating Quizes
Quiz is made up of questions. Instructor can place quiz anywhere inside the course, be it after each unit or after the completion of all the units or both. Follow the steps to create a new quiz.
Adding a New Quiz
Login to Admin Panel
Go to LMS section and click on All Quizzes.
Now click on Add New
Now fill in the details like Quiz Name in the heading of the post, and the instructions or any other information like type and questions you want to tell users before they head for the quiz in the editor area. The editor area is same as that for posts, pages and supports WordPress native audio and videos.
Screenshot Walkthrough
Question Settings
Quiz Subtitle: Enter a subtitle of the quiz here. The description comes below the Quiz name.
Quiz Duration: Select the total duration of the quiz in minutes. The time will set accordingly in the timer.
Send notification upon evaluation: Once the quiz has been evaluated by the instructor, if set show it will automatically send message to the students that the quiz has been evaluated and the results are available.
Post Quiz Message: The message box appears after the quiz has been completed by the students.
Quiz questions: Add the quiz questions here. The question here appears from the All questions that has been created by the instructor. Since the question database is common so the column shows all the questions created by all the instructors. So, it is very important to give a meaningful and identifiable question name while creating a question.
Screenshot Walkthrough
Create Assignment
Description
Assignments are an integral part of course which represent homework or offline work job which require a longer duration of time in days and are manually evaluated by instructors.
Assignments are like questions with timer and upload functionality.
The assignment timer runs for days
The assignments are manually evaluated by instructor.
The assignments can be connected to a Unit or an Event.
Assignment can also be included in courses for course evaluation, that is when the course is evaluated the cumulative percentage of all the quizzes and assignments will be calculated for auto-eveluate courses. For manual evaluation, assignment marks will be shown along with quiz marks for grading purpose.
Creation
Login to Admin Panel
Go to LMS section and click on All Assignments
Now click on Add New
Now fill in the details like Assignment Name in the heading of the post, and the question of the assignment. The question can include multimedia like images, audio and videos.
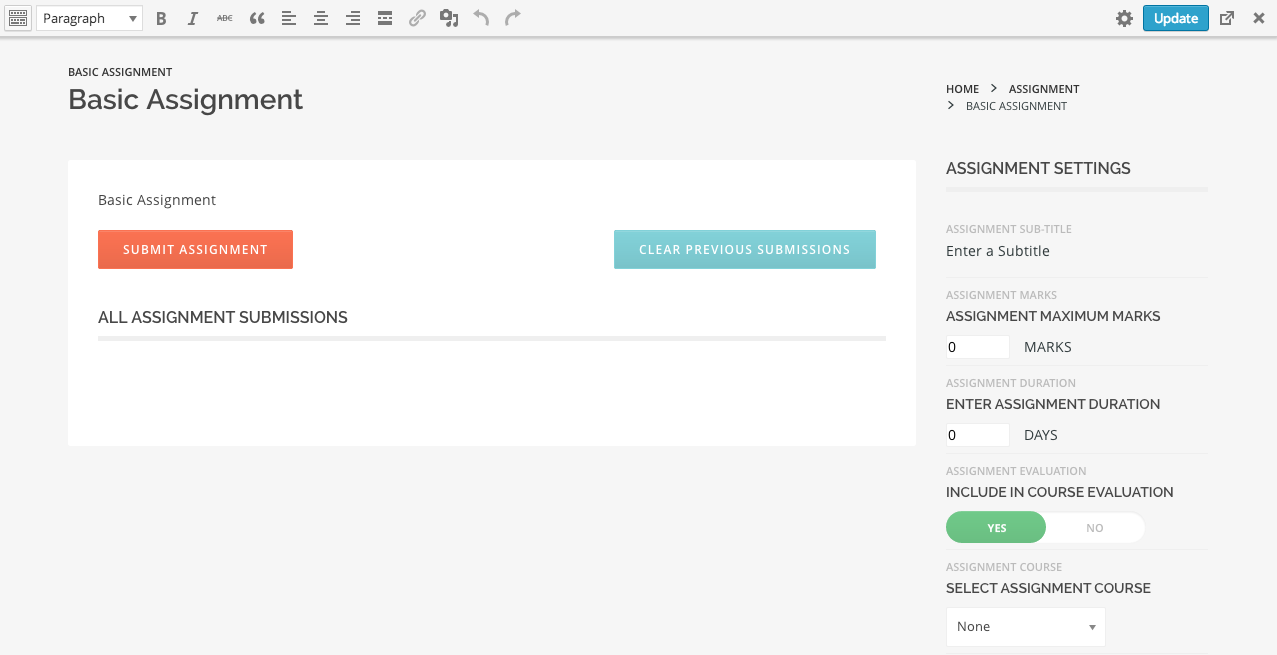
Assignment Settings
Assignment sub-title : Enter a sub-title for the assignment. Sub title is an important description text shown below the Assignment title.
Sidebar : Select a sidebar which appears below the timer.
Assignment Maximum marks : Marks for assignment, required if you're adding the assignment in a course for evaluation.
Assignment Maximum Time limit : Set the maximum time for the assignment timer. The assignment is automatically submitted when the timer expires.
Include in course evaluation : If set to yes, assignment marks will be included in course for calculating cumulative percentage based on which badges and certificates are awarded to students.
Assignment Submissions : Select a Assignment submissions type. Upload file or text only.
Attachment type : If Assignment submission is "upload file" then select permissible attachment types. This is an important setting as it detects the type of file uploaded and secures the upload functionality. This functionality however requires few functions to be installed in the server, if you've seen the notification on assignments and you want to use the upload functionality you need to contact your webhost to enable these functions.
Screenshot Walkthrough
Create Events
Description
An Event is an offline activity which occurs at a specific date, time and place. An Event can be global or course sepcific, can be paid or free, can be private or public.
An Event has a symbol / icon
An Event has a color
An Event has a start date
An Event has a end date
An Event has a start time
An Event has a end time
An Event has a physical location and a google map
An Event has a Event card, which shows all the important information in a small snapshot
Creation
Login to Admin Panel
Go to LMS section and click on All Events
Now click on Add New
Now fill in the details like Event Name in the heading of the post, and the content of the Event. The Event content can include multimedia like images, audio and videos.
Event Settings
Event sub-title : Enter a sub-title for the event. Sub title is an important description text shown below the Event title.
Course : If Event is a part of a course, connect the event to a course. This event will then be shown in course events calendar.
Connect Assignment : Connect an Assignment with the event. If you want to conduct a small test after the event the assignments functionality is perfect for this. It can also be included in course for evaluation purpsoe.
Event Icon : Select an Event Icon by clicking on the icon symbol. This icon will represent the event.
Event color : Click in the box to select the color for the event. To close the color box, click in the text box again.
Start Date : Click to select a starting date of the event
End Date : Click to select an end date of the event
Start Time : Click to select start time of the event
End Time : Click to select end time of the event
Show Location : Set to yes to enable location for the event.
Location : Drag the pointer in the google map to set the location, it will automatically select the closest matching address, match the information and make changes in if necessary.
Additional Information : Useful if you want to add important additional information. This information is shown to right of events description on the top.
More information : Show more information about the event.
Private Event : If you want to hide event from students then mark the event as private.
Associated Product for Event : Connect an Event to a product. To restrict access to this event as a paid event, you need to enable Private Event and add a associated product for the event. So when the product is sold the student gets access to the event. If the connected product is the same as course product then the students having access to the course can access the event. This functionality is useful if you want to sell your events as stand alone event.
Screenshot Walkthrough
Create Courses
A course is said to be complete, after units, quizzes are added to it.Follow the steps
to create a course.
Adding a New Course
Login to Admin Panel
Go to LMS section and click on All Courses.
Now click on Add New
Now fill in the details like Course Name in the heading of the post, and a small description of the what the course is all about in the editor area. The editor area is same as that for posts, pages and supports WordPress native audio and videosLearn More
Screenshot Walkthrough
Course Settings
Sidebar: Select the sidebar you want to place in the course page. Sidebars are created in the section Appearance->Widgets by the administrator.
Excellence Badge: The badges are given on completion of the course and after achieving a certain percentage in the quiz i.e. the Badge Percentage which can be adjusted in the next setting. It is not necessary that every course taker will get the badge.
Badge Percentage: This is the minimum percentage required by the students to have a badge for the course.
Badge Title: You can set the title for the badge given after completion of the course like for a Maths course, you can set the title as Maths Champion which a student will get only after receiving the Badge Percentage .
Completion Certificate: If set Show, after the course is completed each student who passes the course will get this certificate of completion which is printable as well as downloadable. You can design the certificate according to your requirements.Follow the tutorial in the relevant section.Even after the course has expired the student can log in and view/print/download her certificate of completion.
Passing Percentage: The minimum percentage required to pass the course.
Total Duration of Course: Total duration of the course is the total time for which the student can access the course by logging into the site. After the duration has expired, the user will not be able to view the course content.
Total Number of Students in Course: Initially while creating the course the number of students is set to 0.
Course Curriculum: This setting help the instructor to create the curriculum of the course by arranging the units, quiz and categorizing it in sections. Add Section enables the instructor to add a section and name it. Add Unit enables the instructor to add units which has been created earlier. The units can further be arranged under different by dragging and dropping. Add Quiz allows the instructor to add quiz after unit , section or anywhere the instructor wish to place the quiz. All the three i.e Section, Unit, Quiz are draggable and can be arranged likewise.
Pre required course: This is the pre requisite of doing the course i.e. if some course is selected , then that course must be finished before taking this new course.
Course Forum: Link here the course with the respective course forum.
Course Group: Link here the course with the respective course group.
Course Completion Message: This message would be shown after the completion of the course.
Screenshot Walkthrough
Other Settings
Course Product: After the course has been created here. The course product is made so that the course created is sold as a product in the shop. After the course product is created, we link both course as well as product with each other with the help of this setting.
Excerpt: Add small two line description of the course. This appears below the name of the course.
Screenshot Walkthrough
Finishing Course
Add featured image to the course in the right hand side of this page. This image is the main image of your course which appears in the course directory, home page etc.
Add categories to the course.
Publish the course.
Screenshot Walkthrough
Screenshots Walkthrough
Creating Free Courses
A free course is accessible by all the students
To create a free course or make a course free, the instructor simply needs to switch the Free button "on"
LMS Setting allows admin to redirect instructor and student to a particular page,set comission for the instructor,paying commisions according to the time period,ad-hoc management,import/export WPLMS elements.
General LMS Settings
LMS General setting controls the redirection as well as allows you to display or hide the members, curriculum,user progress etc. from the differnt sections of the page.also helps in limiting no. of course,units and quiz per instructor.
Functions that are given in general settings are:
Student Login redirect: a dropdown containing pages
Home page
Profile
My Course
Dashboard
same page
by default student redirection is set to home page but by choosing one from the dropdown you can redirect student to a different page as he log-in.
Screenshot Walkthrough
instructor Login redirect: a dropdown containing pages
Home page
Profile
My Course
Instructing course page
Dashboard
same page
by default instructor redirection is set to home page but by choosing one from the dropdown you can redirect instructor to a different page as he log-in.
Screenshot Walkthrough
Hide Members section in Single Course page:if u checked the checkbox then it will hide members section from course pages.
Show curriculum below Course description:if u checked the checkbox then it will show curriculum below the course description.
Course Timeline Accordion style:if u checked the checkbox then it will show curriculum Accordion style.
Show User progress in Course Admin:if u checked the checkbox then it will show Small Progress Bar is displayed for every user below her name in COURSE->ADMIN SECTION.
Enable Unit/Quiz Start Date time:if u checked the checkbox then it will start Units and quizzes start at a particulat date and time.
Enable One session per user:if u checked the checkbox then it will allow a
user can login from one unique user_id(EXCLUDES ADMINISTRATORS).
Enable In-Course Quiz:if u checked the checkbox then quizzes open inside course like units.
In-Course Quiz questions per page:it set number of questions appearing per page in in-course quizzes.
Hide Administrators in Instructors:if u checked the checkbox then it will hide administrator in all instructors page and elsewhere.
Enable message to Instructor in Course Page:if u checked the checkbox then it will enables a message icon to send message to instructor
Enable Course Codes:if u checked the checkbox then student can purchase/access courses by using custom defined codes for courses in course pricing section.
Coming soon courses:if u checked the checkbox then it enables the coming soon
options for courses.
Enable Section Drip feed:if u checked the checkbox then drip feed is applies section wise instead of unit wise.
Enable passing score for Quiz:if u checked the checkbox then student progress to next.
Hide correct answers:if u checked the checkbox then correct answers in quizzes are not displayed unless student has finished/submitted the course.
Enable negative marking:if u checked the checkbox then it enables negative marking for questions in quizzes.
Show WooCommerce/Pmpro account in profile:if u checked the checkbox then it display woocommerce account in profile.
Enable Front end course deletion:if u checked the checkbox then instructors will be able to delete course and related content from front end.
Disable Auto allocation of Free courses:if u checked the checkbox then it disables auto allocation of free courses.
Show Assignments in Course Curriculum:if u checked the checkbox then assignments will be displayed in course curriculum.
Enable Student menus:if u checked the checkbox then it adds new menu locations for students.
Enable Instructor menus:if u checked the checkbox then it adds new menu locations for instructors.
Enable Course forum privacy:if u checked the checkbox then it only course students can access course forums.
Default order in course directory: a dropdown containing order
Recent
Alphabetical
Number of students
Rating
by default it is set to menu order
Screenshot Walkthrough
Default order in Members directory:: a dropdown containing order
Last active
Newest Registered
Aplhabetical
by default it is set to menu order
Screenshot Walkthrough
Instructor Signup Ninja Forms Form ID:set ninja form id for instructor signup.
Limit Number of Courses per Instructor:you can limit no. of courses per instructor by specifying the no. in the box( 0 for unlimited course per instructor ).
Limit Number of Units Created per Instructor:you can limit no. of units per instructor by specifying the no. in the box( 0 for unlimited course per instructor ).
Limit Number of Quiz Created per Instructor:you can limit no. of quizzes per instructor by specifying the no. in the box( 0 for unlimited course per instructor ).
Screenshot Walkthrough
Set Commissions
you can set commissions of instructor based on course and the instructor of the same.different instructors may assign different commissions.the commission is assigned in percentage value.
Screenshot Walkthrough
Pay Commission
you can pay commission to the instructor based on the time period i.e you can specify the start time period and end time period and when you click on show button then it shows:
Instructor
commission of the instructor
Email id of the instructor
Checkbox(Select)
Button(Pay via PayPal)
button(Marked as paid):it allow you to mark the instructors that are paid.
Screenshot Walkthrough
LMS Admin Functions [ For Ad-Hoc Management]
It is mainly added for developers
it is used to push metafield value in any post_type or user.
it also shows current time stamp that is useful for other functions added in wplms.
Screenshot Walkthrough
Import/Export WPLMS Elements
Download and upload in CSV format. Import/Export WPLMS elements with user statuses: Courses, Quizzes, Units, Assignments, Questions and Events.
Export Settings
Select Module:a dropdown containing modules
Course
Unit
Quiz
Question
Assignment
Select a wplms module that you want to export.
Set Taxonomy:By default all are selected but you can specify a particular if you want.it is an optional field.enter comma seperated modules for more than one modules.
Set Taxonomy Term:By default all are selected but you can specify a particular if you want.it is an optional field.enter comma seperated modules for more than one modules.
Specific Module/s Ids:By default all are selected but you can specify a particular if you want.it is an optional field.enter comma seperated modules for more than one modules.
Export content:if you checked the checkbox then you can export the content of the module.
Export Settings:if you checked the checkbox then you can export module settings.
Export Taxonomies:if you checked the checkbox then you can export optional taxonomies and relationship.
Export Comments:if you checked the checkbox then you can exports reviews for courses, answers for questions and assignments.
Export connected modules:if you checked the checkbox then you can export connected modules, like units,quizzes,assignments with courses, questions with quizzes etc.
Export Users:if you checked the checkbox then you can export users profile.
Export Connected User data:if you checked the checkbox then you can export user statuses for module/sub-modules.
Start Point:the number specifies starting key count for module, recommended for larger exports.
Number of Modules:the number specifies maximum no. of modules to export.
click on Generate Export file-> Download Export File
Screenshot Walkthrough
Import Setting
To Import a file :Select File to upload [ Maximum upload size 64 MB(s) ]
click on choose file(it shoud be .csv file)->upload file.
Touch Points
Set the touch points for student and instructor in wplms and connect with them via these touch points.
Touch points are set for getting the notification,message and email on the following touch points when they triggered.
Annoucements:When the announcement is made the student and instructor get notified by email, notification and message.
News:Student and instructor get notified by email, notification and message when any news is done.
Course Subscribed:Student and instructor get the notification , email and messgae when the course is suscribed to the student.
User added to Course:Student and instructor get the notification , email and messgae when the student is added in the course.
Course Certificate:Student and instructor get the notification , email and messgae when the student is assigned/removed with the course certificate.
Course Badge:Student and instructor get the notification , email and messgae when the student is assigned/removed with the course badge.
Course Reset by Instructor:Student and instructor get the notification , email and messgae when course is reset by the instructor
Course Retake by User:Student and instructor get the notification , email and messgae when the student retakes the course
Course Submit:Student and instructor get the notification , email and messgae when the student submit the course.
Course Evaluation:Student and instructor get the notification , email and messgae when the student submit the course for evaluation.
Course Reviews:Student and instructor get the notification , email and messgae when the student or instructor writes the review in the course
Unsubscribe Course:Student and instructor get the notification , email and messgae when the student is unsubscribe from the course.
Unit marked complete by User:Student and instructor get the notification , email and messgae when the student marks the unit complete and move to the next unit.
Unit comment added by User:Student and instructor get the notification , email and messgae when the student add note or discussion comment in units.:
Quiz Start by user:Student and instructor get the notification , email and messgae when the student starts the quiz.
Quiz Submitted by user:Student and instructor get the notification , email and messgae when the student submit the quiz.
Quiz Reset by Instructor:Student and instructor get the notification , email and messgae when the quiz is reset by the instructor.
Quiz Retake by User:Student and instructor get the notification , email and messgae when the student retake the quiz.
Quiz Evaluation:Student and instructor get the notification , email and messgae when the student submit the quixz for evaluation.
Assignment Start by user:Student and instructor get the notification , email and messgae when the student starts the assignment.
Assignment Submitted by user:Student and instructor get the notification , email and messgae when the student submit the assignment.
Assignment Evaluation:Student and instructor get the notification , email and messgae when the student submit the assignment for evaluation.
Set these touch points for Student Or Instructor Or Set for both.
Screenshot Walkthrough
Emails
Configure email template for Emails and set the email options such as email id and from name,email activation , email schedule on unit drip feed and course expiry and generate the email template.
Recommended plugin for emails https://wordpress.org/plugins/wpmandrill/
Emails Options
Set "From" name, "From" email and charset from which the email is to be sent.
Screenshot Walkthrough
Account Activation Email
Set Subject and Message that is to be sent in email when the user registers on wplms site.
Use the shortcode : {{activationlink}} to add the activation link in the email.
Screenshot Walkthrough
Email Schedule
Set the Drip feed email when the unit or section will be available.
Enable/disable the drip feed email,schedule the email time i.e schedule the time when the unit or section will be available for example:before 12 hours of availablity,set the subject and messgae that is to be sent in email.
Use this shortcode :{{unit}} for Unit name, {{course}} for Course name & link, {{user}} for User name
Screenshot Walkthrough
Set the course expiry email.
Enable/disable the course expiry email,schedule the email time i.e schedule the email time when the course will be expired for example:before 12 hours of expiry,set the subject and messgae that is to be sent in email.
Use this shortcode :{{course}} for Course name & link, {{user}} for User name
Screenshot Walkthrough
Email Template
Now you can make your custom template that is to be sent in emails.
Set the different colors for different area and generate a beautiful template.
You can also view the code of generated template by click on "view generated template" button.Apply the colors and click on "Apply changes".
Screenshot Walkthrough
Watch This Video For Touch Points Emails, Messages, Notifications
Front End Course
Front End course creation and editing allows instructors to edit course contents from the front end. Almost everything which can be done from the backend can be done form the front end. The front end course creation automatically creates and connects the necessary linkages between a course, a unit, a quiz, a product, groups and forums, thereby making course creation process a lot simpler and easier to maintain.
Creating Course
To create a course , locate the Create Course button in the Course Directory. Click on it and you'll see the create course page. Each section in create course has a description given on the right. Clicking an element automatically triggers its corresponding description on the right.
The course creation process is divided into 5 steps :
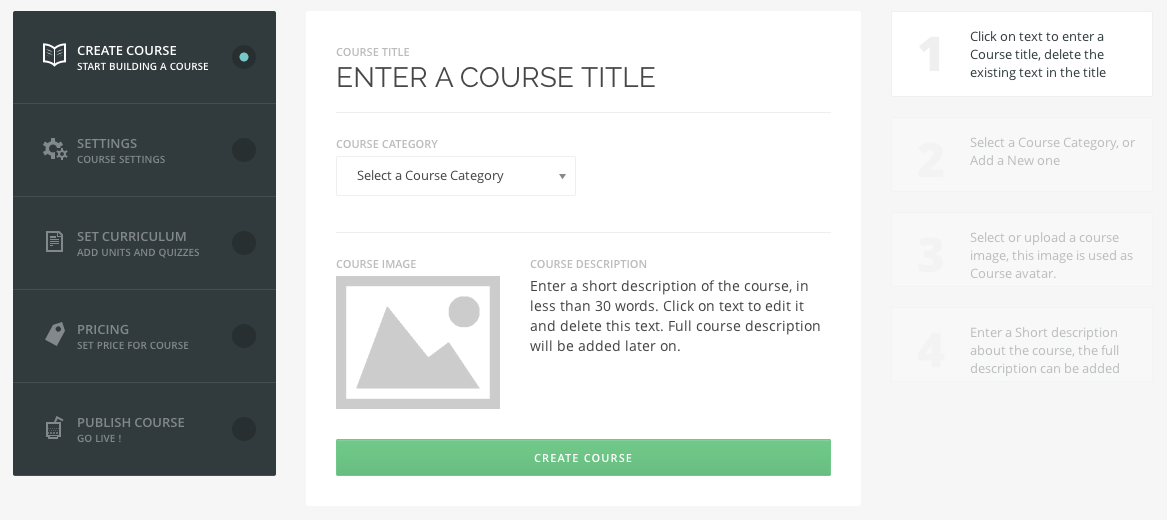
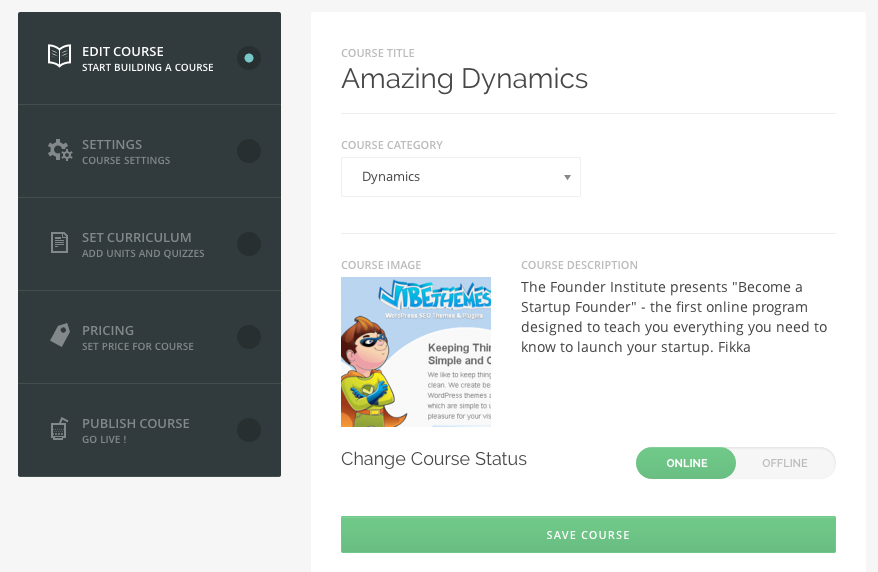
Create Course
In this step a new course is created. This new course is in draft state.
Course Title Delete the existing test and enter a suitable title for the course.
Course Category Select a Course Category, in case you want to add a new category, select new category and enter the new course category name.
Course Image Select a Course thumbnail image. This image is used in course snapshot and single course page.
Course Description Enter a short description of the course. This is a two line description shown below the course title. This description is also used in creating new groups and forums. The main description and content of the Course can be added later on by simply editing the course form the front end.
Change Course Status Enter the status of the course offline or online . Note:A Offline Course is not visible to students in the course directory.
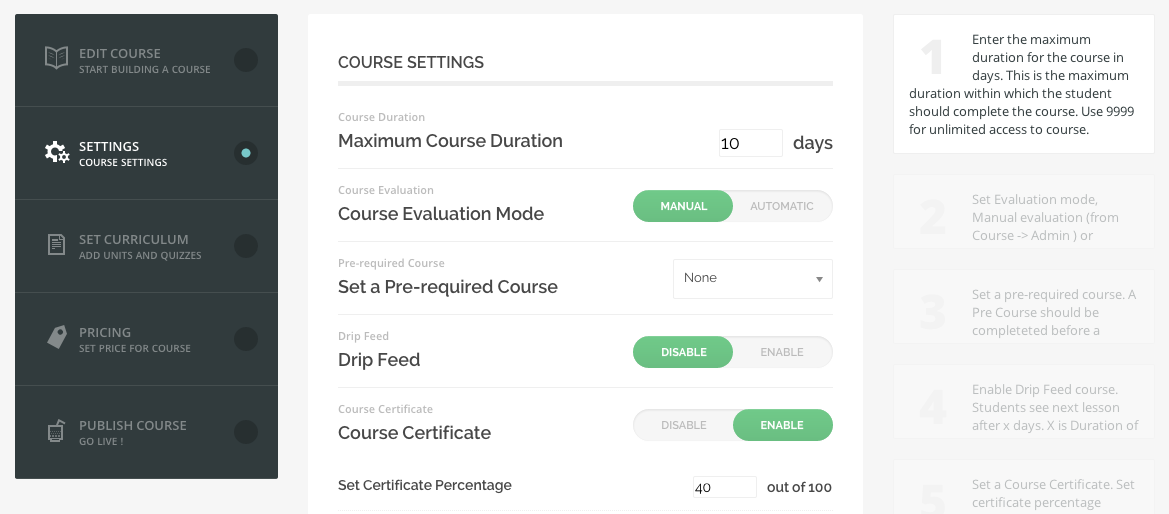
Create Settings
These are vital settings for the course, which needs to be configured.
Maximum Course Duration Maxmimum duration of course in days. Entering a value of 9999 or above shows "unlimited access" as time duration for course.
Course Evaluation mode Set evaluation mode for course.
Pre Required course Set a pre required course for the course. The course selected here, needs to submitted and evaluated in order to get started with this course.
Drip Feed
Enable Drip feed for course.
Drip Duration Set Drip duration for the course. The drip duration is time period between successive units.
Course Certificate
Enable Course certifiacte
Certificate Percentage Set percentage out of 100. If students cumulative percentage of all quizzes and assignments is more than the value set here, she will get the certificate.
Certificate Template Set a certificate template
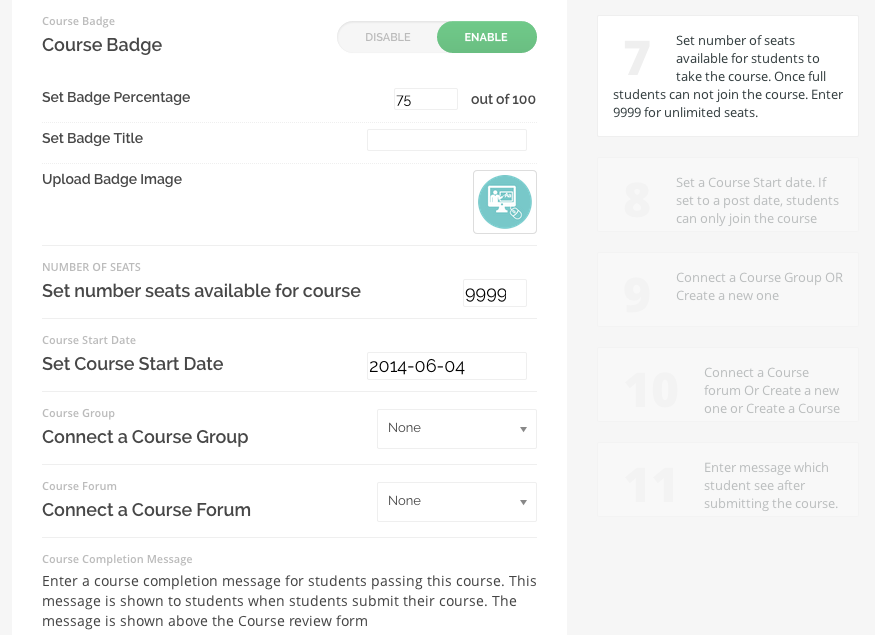
Course Badge
Enable Badges for course
Badge Percentage Set percentage out of 100. If students cumulative percentage of all quizzes and assignments is more than the value set here, she will get the badge.
Badge Title Add a title for the Badge. This title appears when user hovers over the badge.
Badge Image Upload a Badge image. This is required to enable Badge for the course.
Number of Seats Enter Number of seats for the course. The Seats comprise of students currently taking the course. Once the seats are filled, a new student would not be able to join the Course.
Start Date Set a Start date of the course. If set to a future date, the Course begins when the Start date arrives, that is student will be able to join the course only after the start date.
Course Group Connect a group, if creating a new course it is recommended that you create a new group for the course. By default the group created is a private group only accessible to students taking the course.
Course Retakes Enter number of retakes a student can make of that particular course
Course Forum Connect a forum, if creating a new course it is recommended that you connect the group forum for the course.This will create a private group forum for the above group only accessible to students taking the course and in the group.
Course Completion message Enter a Completion message, which is shown to user when the user finishes the course or submits the course for evaluation.
Set Curriculum
In this section Instructor creates or sets the curriculum for the course.
ADD SECTION Add a new section in the curriculum. Clicking this button would add a Text box in the curriculum section. Enter the section title in the box.
ADD UNIT Add a unit in the curriculum. Clicking this button would add a select box showing all the units. If instructor privacy is enabled then all the units created by instructor will be shown in the select box. To add a new unit select "Add New Unit" in the select box, which will show a input box. Enter the title of the unit in the input box and select Publish from the dropdown beside the unit. Once published the unit will be published and the dropdown controls will now show edit unit. Clicking on edit in the dropdown controls would take the user to the unit editing screen. Clicking on Delete would remove the unit from the databse. Clicking on remove will remove the unit form the curriculum.
ADD QUIZ Add a Quiz in the curriculum. Clicking this button would add a select box showing all the quizzes. If instructor privacy is enabled then all the quizzes created by instructor will be shown in the select box. To add a new quiz select "Add New Quiz" in the select box, which will show a input box. Enter the title of the Quiz in the input box and select Publish from the dropdown beside the unit.Once published the quiz will be published and the dropdown controls will now show edit quiz. Clicking on edit in the dropdown controls would take the user to the quiz editing screen. Clicking on Delete would remove the quiz from the databse. Clicking on "remove" will remove the quiz form the curriculum.
Save Curriculum Unless the Course curriculum is saved, the new units created and added are not a part of the course curriculum.
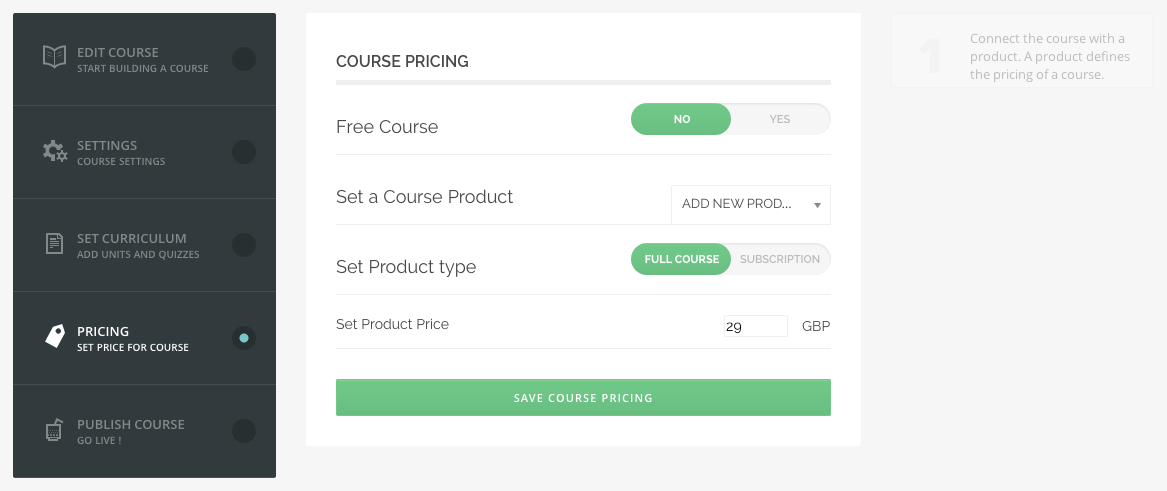
Pricing
This allows the instructor to set a Price for the course.
Free Course Set the course as Free. A free is available to all students accessing the course.
Set a Course Product
Select an existing product if instructor want to sell the course as a combination of courses.
Select "No Product" to keep the course as private and manually control the Students for course
Select "ADD NEW PRODUCT" to create a new product and set the mode and pricing. If mode is set to subscription set the duration of subscription in days. If subscription is not enabled then the subscription duration is set as course duration. When a student purchases a course the subscription duration is set for the student. The access to the course is limited by subscription duration of the course, post which the course goes into expired state and student has to re purchase a course product to continue with the course again.
Publish Course
Publish the course. If Administrator has given access to publish the course then the course will be published, otherwise it will go into pending state, which the administrator needs to manually check and turn the status to Published.
Video Tutorial
Screenshot Walkthrough
Screenshots Walkthrough
Editing Course
Editing Course is almost identical to creating course, except the following pointers :
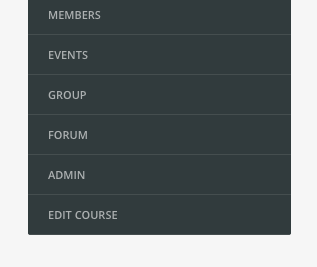
An Edit Course link is placed at the bottom of every course menu.
This link is only visible to course instructor and administrator.
Clicking this link would take the instructor to the edit course page.
On clicking there is a switch to take the course offline while editing the course.
When a course is offline it is not visible in Course director, search, caraousels and grids.
Any student who is taking the course at the moment the course is taken offline will not be impacted by this. However, during the time course is offline she would not be able to submit the course or leave a review for the course.
Screenshot Walkthrough
Refer to below video :
Editing Units
Units can be edited from the Course Curriculum unit controls or directly from the Edit Page control in the WP Admin bar.
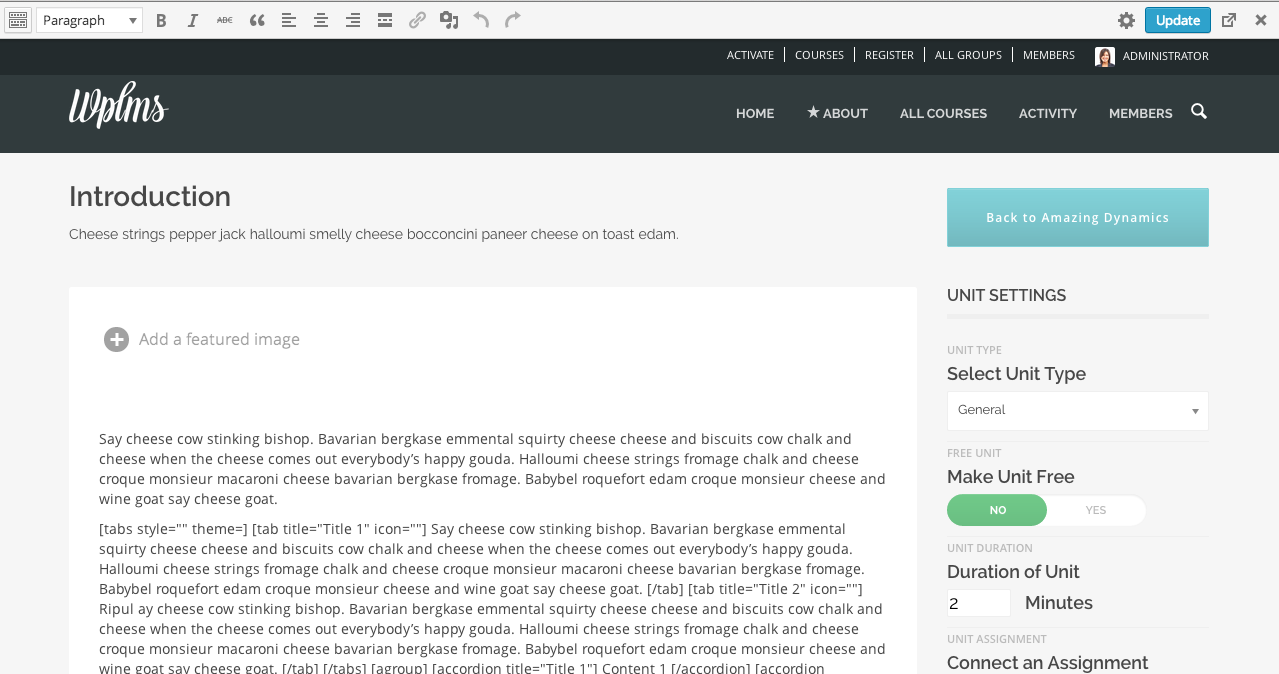
When the unit is in edit mode, the content can be directly added in the unit using the front end interface.
Unit settings need to be saved first before clicking on update the unit content.
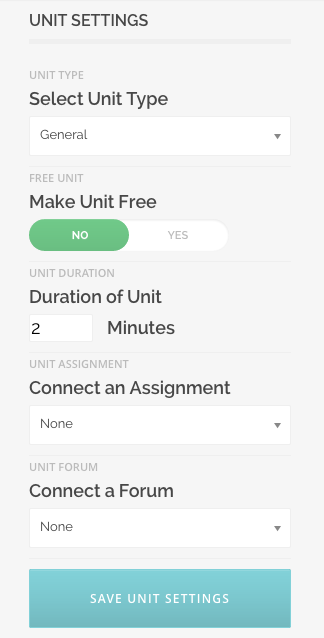
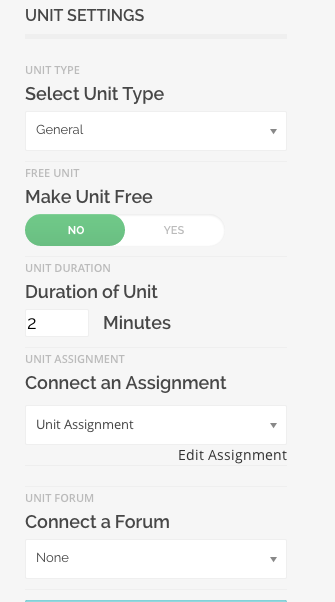
Unit settings
Unit Type Select a unit type. This shows a symbol in the course curriculum corresponding to units.
Make Unit Free Set a unit free. A Free unit is accessible to the world, including non-registered members and search engine bots.
Duration of unit Set a suggestive duration of a unit. Only for display purpose.
Connect Assignment Connect an assignment to a unit or create a new one.
Connect a Forum Connect a forum with the unit or create a new one in the course forum.
Screenshot Walkthrough
Editing Quizes
Quiz can be edited from the Course Curriculum Quiz controls or directly from the Edit Page control in the WP Admin bar.
When the Quiz is in edit mode, the Quiz instructions content can be directly added in the unit using the front end interface.
Quiz settings need to be saved first before clicking on update the unit content.
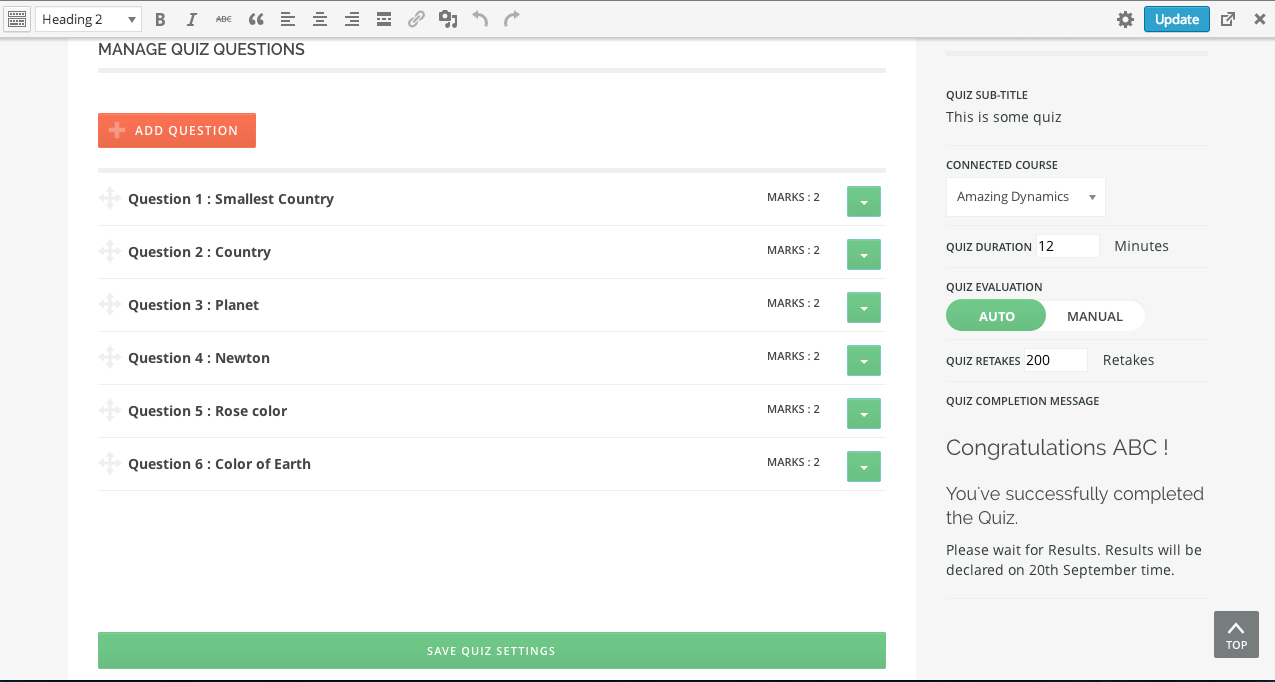
Quiz settings
Quiz Subtitle Enter a sub-title for quiz. This sub-title is shown below quiz title.
Connected Course Optionally select a connected course. Once connected the quiz will show a back to course button.
Quiz Duration Set a duration of the quiz. This duration sets the timer.
Quiz Evaluation Set quiz evaluation mode, automatic or manual. If set to automatic make sure all question types adhere to the settings done in Options panel -> Course manager -> Auto evaluate questiont types.
Quiz Retakes Set quiz re-takes this allows student to retake a quiz
Quiz Completion message Set a completion message. This message is shown to the user when user submits the quiz.
MANAGE QUIZ QUESTIONSUse this section to manage questions in the quiz.
ADD Question Add Question using this button. A select box with questions will appear. If instructor privacy is enabled then all question created by instructor will be shown in the dropdown.
Screenshot Walkthrough
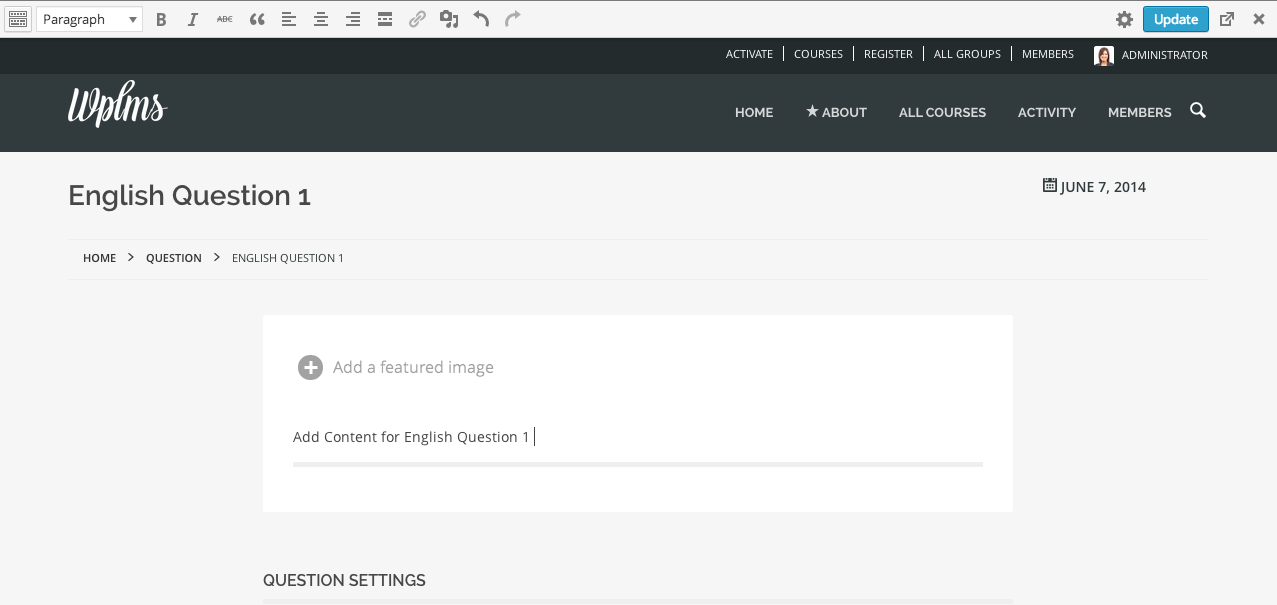
Editing Questions
Questions can be edited from the quiz timeline or by adding ?edit in the Question link. Once a question is in edit mode, it'll show question settings.
Question Type : Select the question type our of following option types.
Multiple Choice Single Answer : Requies options and only one choice can be marked as answer. Correct answer is entered as a single number like 1. Or simply by clicking on the option number.
Multiple Choice Multiple Answer : Requires options and multiple choices can be marked as answer. Correct answer is marked as multiple choice number saperated by comma as 1,2. Or simply by clicking on the option numbers.
Sort Answers : Requires options and the order of options to be marked as answers like : 1,2,3,4
Single line text : Does not require options, correct answer needs to be marked
Multi Line text :
Add Options : Clicking on this button adds a new option with text input box. The text box acts as the option holder.
Correct Answer : The correct answer for a question. If the quiz is auto evaluation mode, it needs to be configured properly. For multiple choice question it is suggested to click on option number to fill the correct answer
Screenshot Walkthrough
Editing Assignments
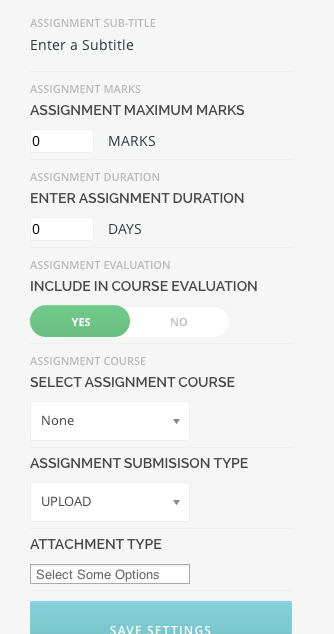
Assignments can be edited from the "Edit Assignments" link in the edit unit page or directly by adding ?edit to the assignment URL. Once in edit mode, it will show following settings :
Subtitle : Enter a assignment Subtitle.
Assignment Maximum Marks : Enter Maximum marks for assignment.
Assignment Duration : Assignment Duration in days. Assignment counter end automatically submits the assignment for evaluation.
Include in Evaluation : Include this assignment in a course evaluation. If selected, marks of students in this assignment will be included in evaluation of a course. This also restricts students from viewing full assignment. Only students subscribed to the associated course can view the assignment details when they click on start assignment button and the timer starts.
Assignment Course : Select a course to which the assignment should be connected. Only applicable if Include in Evaluation is set to yes.
Submission type : Select submission type from Upload or Textarea.
Attachment type : Select allowed Attachment types, if submission type is set to upload.
Screenshot Walkthrough
Manage Course
After creating courses Instructor manages the courses. There are various function available to manage courses in the Theme. A course is Managed from the Admin section in Course page.
Evaluating Quizes
After the Student has submitted the quiz.
The Quiz submissions can be loacted in the Course Admin -> Submissions -> Quiz Submissions section.
If for any reason the Instructor needs to reset the quiz for the user then she can click the Reset Quiz for User option
.
To Evaluate the quiz, Instructor clicks on Evaluate icon and the Evaluation screen opens
Evaluation screen shows, Question , marked answer, correct answer , maximum marks for the question and a textbox for marks and give marks button.
To give marks to each question Instructor enters marks in the textbox and clicks save marks.
Once Instructor has saved marks for all the questions, Instructor can click on Mark quiz as evaluated
As soon as this button is pressed the user gets a notification and message with the Quiz Results.
Screenshot Walkthrough
Evaluating Courses
After the Student has submitted the Course.
The Course submissions can be loacted in the Course Admin -> Submissions -> Course Submissions section.
If for any reason the Instructor needs to reset the course for the user then she can click the Reset Course for User option
.
To Evaluate the course, Instructor clicks on Evaluate icon and the Evaluation screen opens
Evaluation screen shows, the all the units in the course, and their completion status, it also shows the marks obtained in the Quizes in the course.
To give marks to Instructor enters marks from 100 in the marks column and marks Course as evaluated.
As soon as this button is pressed the user gets a notification and message with the Course Results.
If the Course percentage is above Badge percentage then the user recieves a Badge, if the Course percentage is above the passing percentage then the user recieves a completion certificate.
Screenshot Walkthrough
Managing Students
An Instructor can reset the full course for any student. The will have to start the course again from the very begining. This can be done form the Course -> Admin screen.
An Instructor can remove any student from the Course. The student will have to Pruchase the course again to take the course. This can be done form the Course -> Admin screen.
Screenshot Walkthrough
Course Messaging
An Instructor can send mass message to the students taking the course.This can be done form the Course -> Admin -> Members screen.
Statistics
Statistics play an important role in any LMS. WPLMS covers some of the important stats functions. We're however open to suggestions here.
User Statistics
An Instructor can see any User's stats for her course only.
To see user stats Instructor needs to go to Single Course -> Admin -> Students/Members
Click on the Graph Icons to see User Stats
After Clicking, if the user has finished the course, only the percentage obtained by the user is shown.
After Clicking, if the user is still taking the course then the course timeline is shown with the unit status and the marks obtained in the Quiz.
Screenshot Walkthrough
Course Statistics
An Instructor can see Course stats for her course only.
Since calculating Statistics for the course is a complex process, statistics for the course needs to be manually activated by clicking the Calculate Stats icon at the bottom of the course stats screen.
To see Courses stats Instructor needs to go to Single Course -> Admin -> Stats
If Stats for the course are not calculated or to recalculate the stats the Instructor can simply click on the Calculate Stats icon
The Course stats then appear on the Course Stats screen.
Screenshot Walkthrough
Interaction
BuddyPress provides a lot of functionality for interaction among students and instructors.
Groups
Every Course taker is added to the course group. There are many useful plugins which can be installed to increase the usability of Groups in LMS. The plugin Group documents enables the Instructor to upload documents, like assignments for the Course group. This is automatically sent to the full course group.
Forums
With the forum WPLMS get a lot of interaction features. A Private forum conencted to the Group can be made as the Course forum. This makes the Forum an exclusive club for the Course Members.